


Disclaimer:
I made this tutorial as part of my personal future reference. This is a consolidated instructions in preparation for Dashing Setup based on the research I made that worked on my project. I have made multiple trial and error and came up with this working guidelines.
ICINGA 2 is an open source monitoring system which checks the availability of your network resources, notifies users of outages, and generates performance data for reporting.
Scalable and extensible, Icinga 2 can monitor large, complex environments across multiple locations.
Let's Start!
First, we need to enable the add-repository feature and then add its repositories.
root@ubuntu:~#apt install software-properties-common
root@ubuntu:~#add-apt-repository ppa:formorer/icinga
root@ubuntu:~#apt-get update
Next, we will now install the Icinga 2 from the added repository.
root@ubuntu:~#apt-get install icinga2
After the installation, we will make sure that the service is up and running.
root@ubuntu:~#systemctl enable icinga2.service
Synchronizing state of icinga2.service with SysV init with /lib/systemd/systemd-sysv-install...
Executing /lib/systemd/systemd-sysv-install enable icinga2
Synchronizing state of icinga2.service with SysV init with /lib/systemd/systemd-sysv-install...
Executing /lib/systemd/systemd-sysv-install enable icinga2
root@ubuntu:~#systemctl start icinga2.service
root@ubuntu:~#systemctl status icinga2
We will need to enable the feature list.
By default, Icinga2 enables the following features. But we can confirm the enabled setting by running this commands.
root@ubuntu:~#icinga2 feature list
Disabled features: api command compatlog debuglog gelf graphite icingastatus livestatus opentsdb perfdata statusdata syslog
Enabled features: checker mainlog notification
Disabled features: api command compatlog debuglog gelf graphite icingastatus livestatus opentsdb perfdata statusdata syslog
Enabled features: checker mainlog notification
The following features are enabled by default:
Checker : This feature enables the execution of checks.
Mainlog: This feature enables the logging.
Notification : This feature enables notification mechanism.
Command: This feature enables external Icinga command
If you encounter the error below, it means command feature isn't enable.

Enable command feature and restart Icinga2.
root@ubuntu:~#icinga2 feature enable command
Installing Icinga2 Plugin
Icinga2 will collect the service information based on the monitoring plugins. We will now install nagios plugins for this function.
root@ubuntu:~#apt-get install nagios-plugins
Installing Data Output Module (IDO)
We will use MySQL as the external database. Hence, we need to install the MySQL IDO module which is used for Icinga2 web interface. It is used for exporting all configuration and status information into its database.
root@ubuntu:~#apt-get install mysql-server
In order to have at least minimum security at our MySQL service, we should run the mysql_secure_installation wizard and follow the steps.
root@ubuntu:~#mysql_secure_installation

Next is the IDO Module.
root@ubuntu:~#apt-get install icinga2 icinga2-common icinga2-ido-mysql icinga2-bin
During the package setup you will be asked about the database backend and its credentials.


Once the IDO module is installed. We need to setup our MySQL DB to accept the values using this module. I created a database named "Icinga2" with the username "icinga2" and password "icinga123"
root@ubuntu:~#mysql -u root -p
mysql>Create database icinga2;
mysql>GRANT SELECT, INSERT, UPDATE, DELETE, DROP, CREATE VIEW, INDEX, EXECUTE ON icinga2.*TO 'icinga2'@'localhost' IDENTIFIED BY 'icinga123';
mysql>flush privileges;
mysql>Create database icinga2;
mysql>GRANT SELECT, INSERT, UPDATE, DELETE, DROP, CREATE VIEW, INDEX, EXECUTE ON icinga2.*TO 'icinga2'@'localhost' IDENTIFIED BY 'icinga123';
mysql>flush privileges;
root@ubuntu:~#icinga2 feature enable ido-mysql
warning/cli: Feature 'ido-mysql' already enabled.
warning/cli: Feature 'ido-mysql' already enabled.
After enabling this module and creating the database we need to restart our Icinga2 service. Please make sure the IDO MySQL configuration file is properly set with correct DB credentials.
root@ubuntu:~#cat /etc/icinga2/features-enabled/ido-mysql.conf
/**
* The db_ido_mysql library implements IDO functionality
* for MySQL.
*/
/**
* The db_ido_mysql library implements IDO functionality
* for MySQL.
*/
library "db_ido_mysql"
object IdoMysqlConnection "ido-mysql" {
user = "icinga2",
password = "icinga123",
host = "localhost",
database = "icinga2"
}
user = "icinga2",
password = "icinga123",
host = "localhost",
database = "icinga2"
}
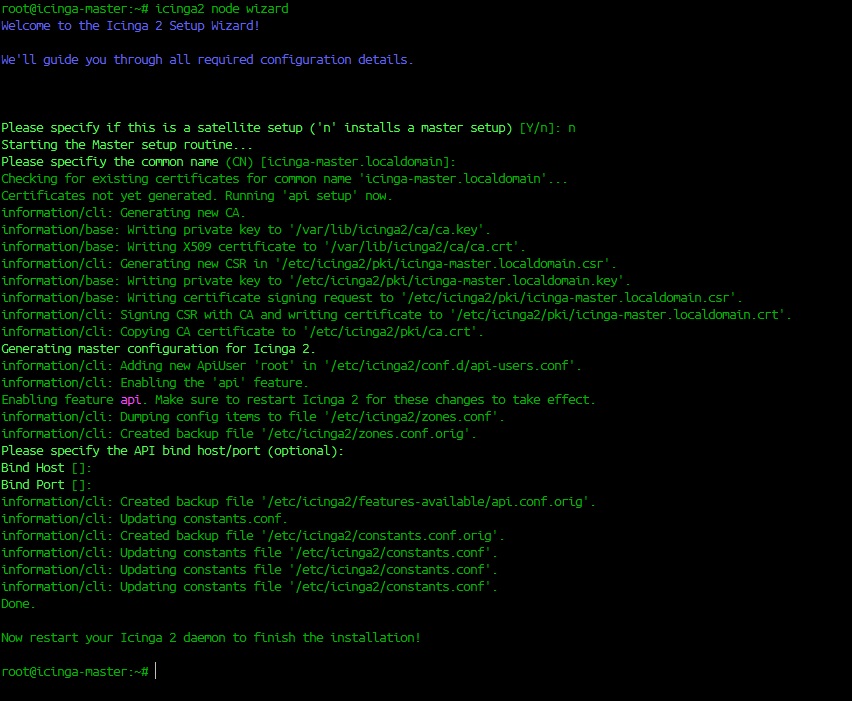
We need to run the icinga2 node wizard to make a basic setup.
root@ubuntu:~#icinga2 node wizard
Restart Icinga2
root@ubuntu:~#systemctl restart icinga2
root@ubuntu:~#systemctl status icinga2
To check if the icinga2 user is able to reach its databases.
root@ubuntu:~#mysql -u icinga2 -p icinga2 -e "show tables"
Installing Icinga Web2 Plugin
The Icinga core is completely configurable and usable without a web interface, but Icinga Web provides a nice browsable overview of the health of your hosts and services, and allows you to schedule downtime, acknowledge issues, manually trigger health checks, and send notifications, right from your browser.
But before installing the icinga web2 plugin, we must first install the PHP application on the server.
root@ubuntu:~#add-apt-repository ppa:ondrej/php
root@ubuntu:~#apt-get install php
root@ubuntu:~#php -v

root@ubuntu:~#apt-get install php7.0-gd php7.0-json php7.0-dba php7.0-intl php7.0-ldap php7.0-pdo-mysql php7.0-imagick php7.0-dom
To avoid PDO-PostgreSQL error on web setup, install the package below
root@ubuntu:~#apt-get install php7.0-pgsql
We will use the MySQL database to save all instincts of my icinga web2 interface. I will create a database called "icingawebdb" with username "icingaweb" and password "icinga123" with full privileges.
root@ubuntu:/usr/share/icingaweb2#mysql -u root -p
Enter password:
Enter password:
mysql> create database icingawebdb;
mysql> GRANT SUPER ON *.* TO 'icingaweb'@'localhost' IDENTIFIED BY 'icinga123';
Query OK, 0 rows affected, 1 warning (0.00 sec)
Query OK, 0 rows affected, 1 warning (0.00 sec)
mysql> GRANT SELECT, INSERT, UPDATE, DELETE, DROP, CREATE VIEW, INDEX, EXECUTE ON icingawebdb.*TO 'icingaweb'@'localhost' IDENTIFIED BY 'icinga123';
We can now install the web interface plugin. Apache2 and other web packages gets installed alongside with this plugin.
root@ubuntu:~#apt-get install icingaweb2
The rest of Icinga Web's setup is done in a web browser, but before we switch over, there's one setting we need to update. Icinga Web needs a timezone to be set for the PHP environment, so let's edit the PHP config file:
root@ubuntu:~#nano /etc/php/7.0/apache2/php.ini

Restart Apache2
root@ubuntu:~#service apache2 restart
After everything done correctly, we can now proceed on the web interface setup.
1. Open a web browser and type the following :
http://<your ubuntu server ip address>/icingaweb2/setup
You will then be greeted with this screen below:
<!--?php /*! Icinga Web 2 | (c) 2014 Icinga Development Team | GPLv2+ */ require_once '/usr/share/php/Icinga/Application/webrouter.php'; -->
<html>
    <head><head/>
    <body><body/>
</html>
Install libapache2 mod with this command.
root@ubuntu:~#apt-get -y install php7.0 libapache2-mod-php7.0

Go back to your icinga2 server and generate the setup token.
root@ubuntu:/usr/local/src#addgroup --system icingaweb2
addgroup: The group `icingaweb2' already exists as a system group. Exiting.
root@ubuntu:/usr/local/src#usermod -a -G icingaweb2 www-data
addgroup: The group `icingaweb2' already exists as a system group. Exiting.
root@ubuntu:/usr/local/src#usermod -a -G icingaweb2 www-data
root@ubuntu:/usr/local/src#icingacli setup config directory --group icingaweb2;
Successfully created configuration directory /etc/icingaweb2
root@ubuntu:/usr/local/src#icingacli setup token create;
The newly generated setup token is: 1951e1eb11110e65
Successfully created configuration directory /etc/icingaweb2
root@ubuntu:/usr/local/src#icingacli setup token create;
The newly generated setup token is: 1951e1eb11110e65
On the web interface enter the generated token and click next.

2. Select the Modules.
On this screen I am showing the preferred modules for the installation. Some other modules may appear on this part but you may only select these 3 modules.

3. Verifying the PHP Settings.
If you have followed correctly the instructions above, all should be green here and just click next. However, if any of the required modules were missing, you can simply install it on the icinga2 server via apt-get.

4. Authentication Method
On this setup, we will be using the Database authentication method.

5. Fill out the database details.
Input the details we have previously created and then click on validate configuration. You can also leave the port as blank.

Enter icinga2 server root credentials.

Create Authentication Backend.

6. Create Icinga Web Admin Account.
This will be the main account to be used for administering the web interface. Create your desired username and password.

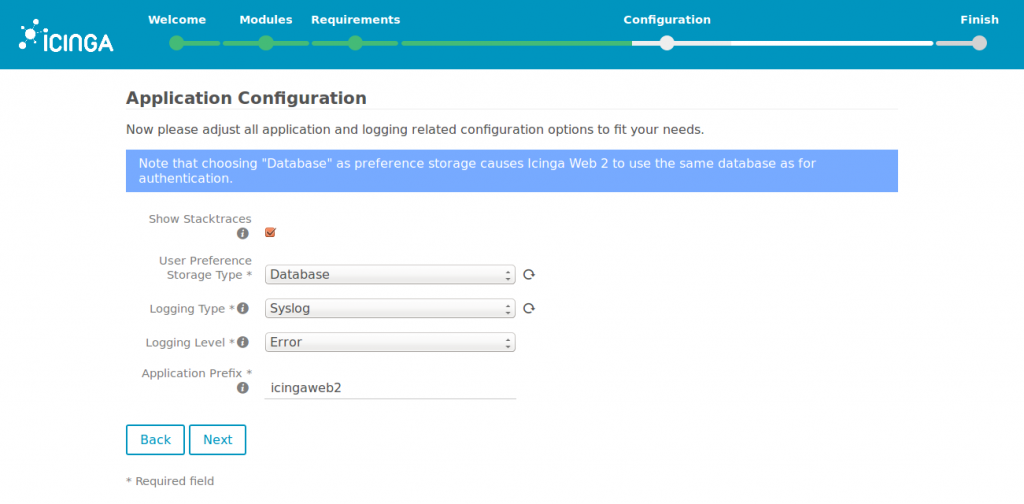
7. Choose the Application Configuration Options.
8. Review all the chosen settings.
If all settings are good, click Next.

9. Monitoring Module Configuration
After successful authentication setup, we will now proceed on the monitoring module.

Icinga uses IDO Module to export all status information and configuration parts to the Icinga main database.

Provide the database information we have previously created. Click on Validate Configuration to check if the details were correct and click next.

Leave it as default and click Next.


10. Review the monitoring module configuration
If all looks good, you can confirm the setup and proceed to final step.

Final Step: Web Interface Login
You can now login using the credentials we have previously created.

The Master Node is added by default to the system. You can access the Web Interface via web browser.
http://<your ubuntu server ip address>/icingaweb2

Many Thanks to:
https://linoxide.com/
https://github.com/
https://www.digitalocean.com/
https://serverfault.com/
for being my full reference in completing this project.


No comments:
Post a Comment